
Training Flip Cards


Intro
Store Task is our internal website where admin tasks of Stock Handling and DOC maintenance take place. You need to access Store Task in order to do Stock Counts, Confirm orders, Confirm deliveries or Report store fixtures and machinery that needs to get fixed.
This is a guide on how to navigate and use the Store Task website.
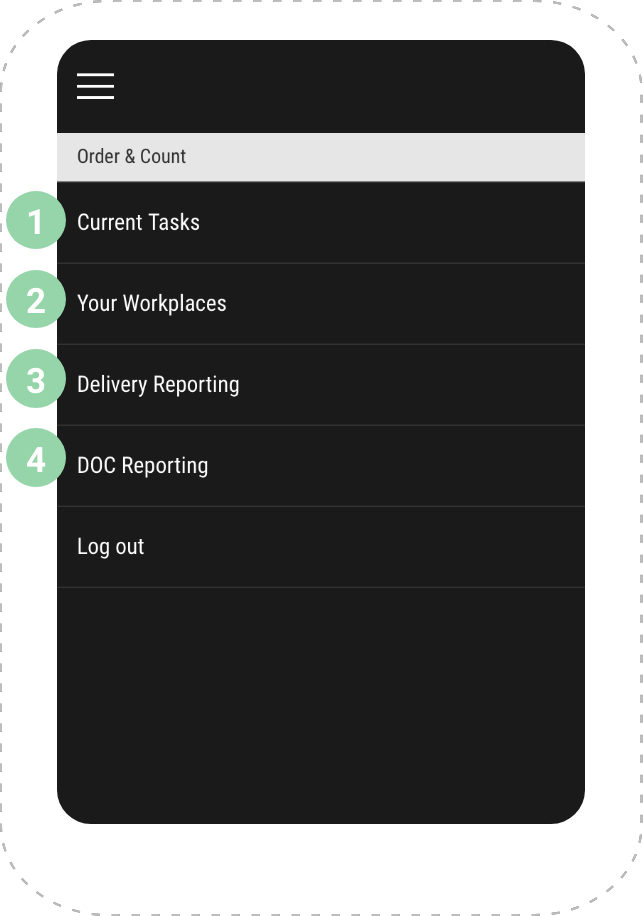
Menu Overview
1. The weekly tasks for the specific store.
2. This tab is connected to WP2. Your workplaces are the stores you are assigned to. If you are a Bar Manager you will automatically be assigned to your store through WP2.
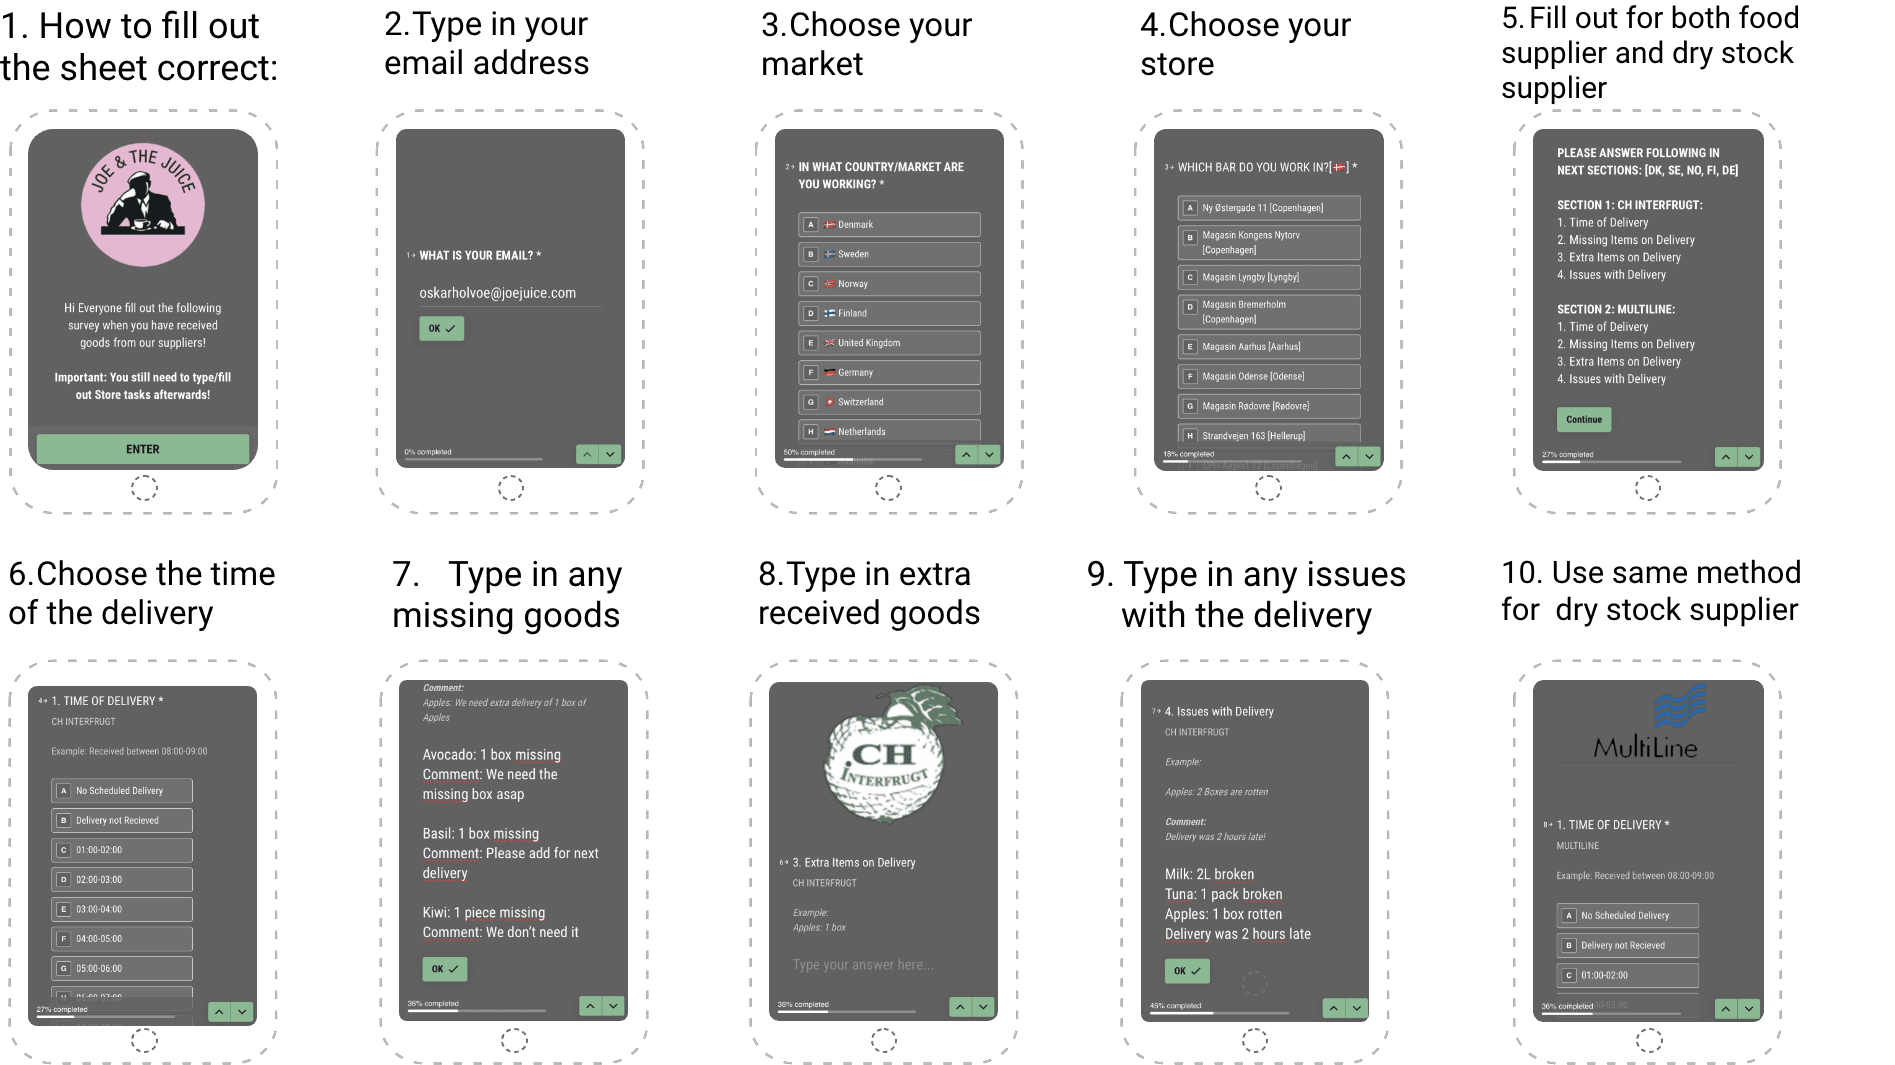
3. This is the Typeform you have to fill out in order to inform the Purchasing Manager about the delivery.
4. Reporting of broken machines in the store.

1.0 Current Tasks
• View your weekly tasks.
• Make sure you always check that it is the correct day before opening a task.
• When a task is completed it will be shown by the tick sign.
• If you experience features not working or have ideas to optimize the Store Task, you can open the “Feedback” tab and share your thoughts.

1.1 Count
• When entering the count, you can split the count into different sections according to where your goods are stocked in the store. Press the plus tab if you want to add a new section.
• Preferably the counting areas should be: Bar – Stockroom – Back of House or Stockroom 2. Do not specify and complicate the counting areas too much!
• When counting different areas in the store, all amounts will be added and put together in the final count.
• The sequence you count in the first time will appear next week, so you can count in the same sequence again.
• If you want to change the sequence, swipe the good to the left to remove it. Then you can add the other item you want instead. Then this will be your new sequence for next week.
• When each area is done and counted, confirm the counting area.
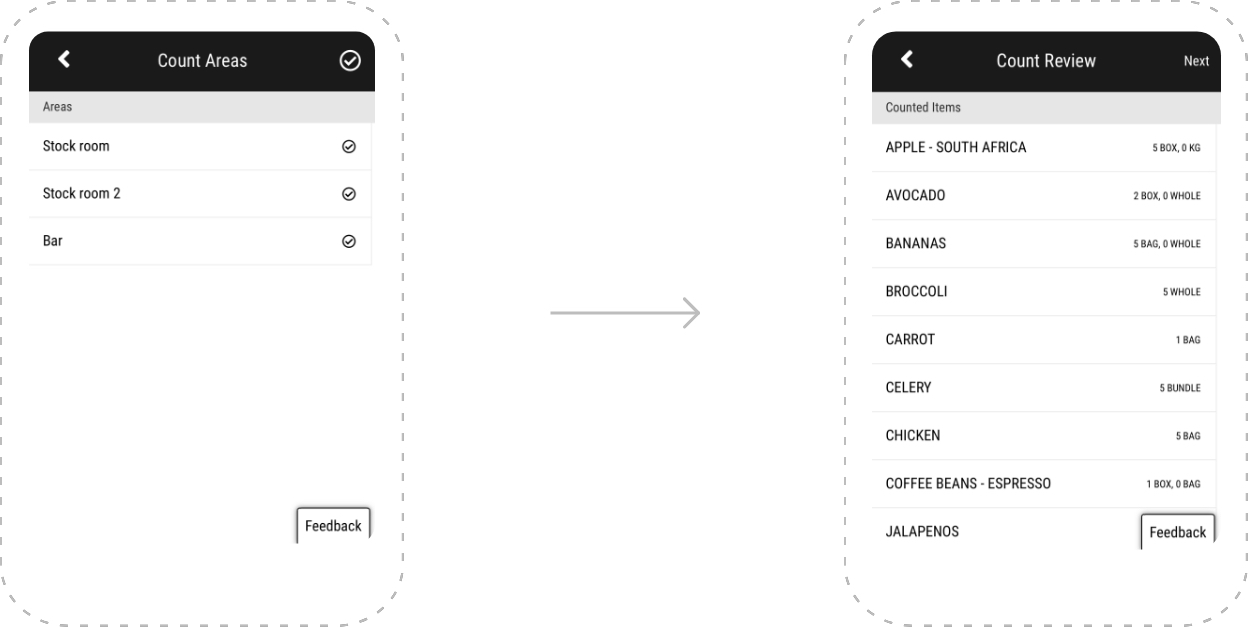
1.1 Count
• When all areas each have been confirmed, confirm the count by tapping the tick-sign in the top right corner. Now you will get a full Count Review of the whole count summing up each counting area.
• This should be looked through, so no mistakes happen. If you want to change the amounts of counted goods, go back to the specific counting area, and change the amount. When you have double-checked the amount of each good, choose “Next” in the top right corner.
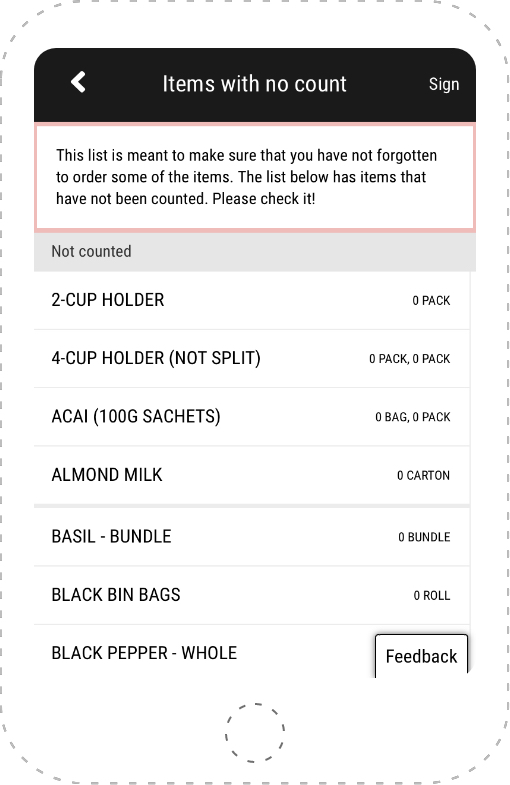
1.1 Count
• Now, you will get an overview of all items and goods that haven’t been counted, also known as zero-count.
• Make sure that you don’t forget to count any items. If you want to edit any of the zero-count items, tab the item in the overview and you will be directed to the counting areas again.
• When you have modified the zero-count items and made sure that none of them actually are in stock and, furthermore, that all items in the Count Review are 100% correct, you sign the count by tapping the button in the top right corner.
• You will later on the same day receive a Re-count with possible counting mistakes. You should look through your recount forwarded by the Purchasing Manager and edit any possible mistakes as soon as the Re-count sheet is received. Remember to sign the count again after editing any goods or items.
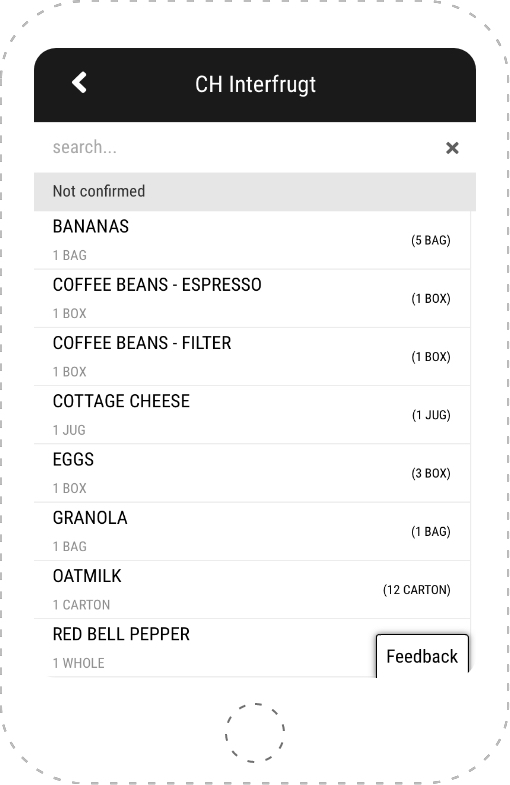
1.2 Order
• When you have completed the count and made possible changes according to the re-count, you need to confirm the ordering of goods for the next delivery right after. You should not confirm the ordering before the re-count has been done, otherwise the changes won’t be included.
Sequence:
Execute count –> Edit possible re-counts –> Confirm order
• The size of the ordering depends on your ideals. So, if your ideal for milk is 50L and you count 20L, then your order will be on 30L.
• When entering the ordering section, tab each good and confirm it once at a time. When all goods have been confirmed, confirm the whole order at the bottom.
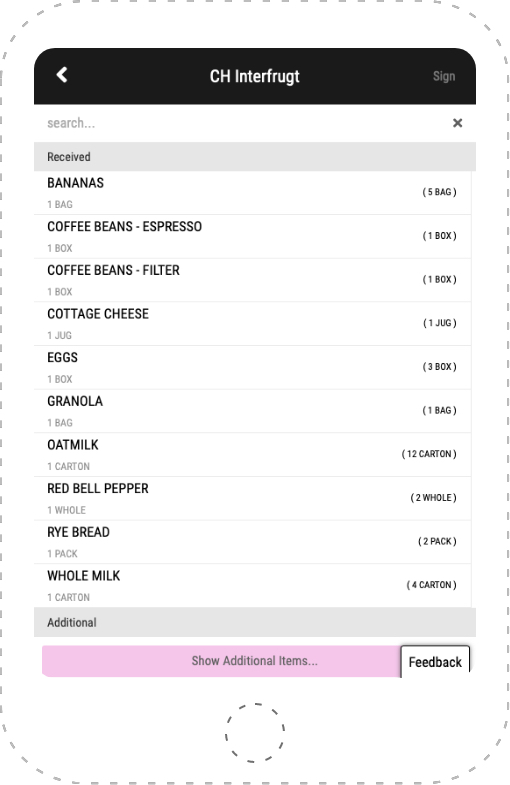
1.3 Receive
• When you take the delivery, you should match the number of delivered goods with the invoice from the supplier. When the delivery is done, then match the invoice with the receiving list on Store Task.
• Choose and confirm each good at a time. If you didn’t receive the correct amount of a specific good, tab the minus or plus sign to enter the correct amount.
• If you received an unexpected good, find it in “Show Additional Items” and add it here.
• The “Receive” overview should be 100% similar to what you actually received. When you are done, tab the sign icon in the top right corner. Now fill out the Delivery Reporting Typeform.
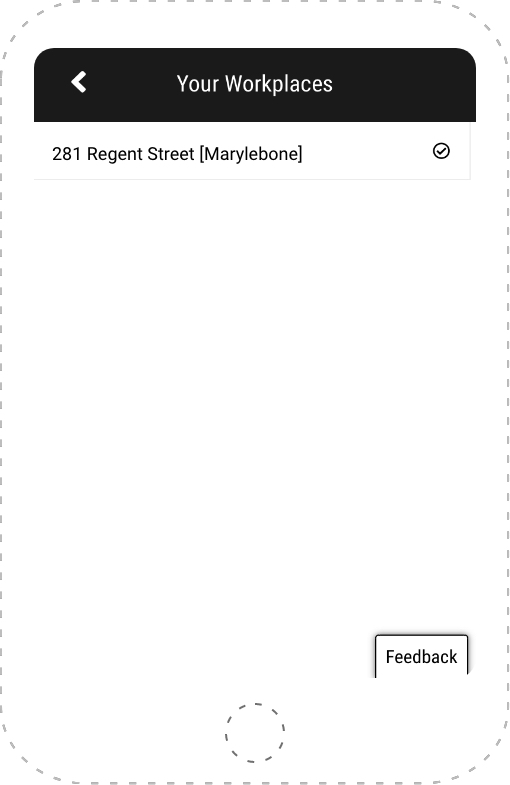
Your workplaces
• Your workplaces is simply just a list of the stores you are assigned to. This feature is more relevant for Regional Manager’s and SWAT’s who are doing tasks in several stores.
• When you are assigned to more stores, it is crucial that you always double-check that you are opening the right store’s Current Tasks.
Delivery Reporting
The Delivery Reporting is the Purchasing Manager’s tool to follow up on each delivery. The Delivery Reporting Typeform must be filled out after every single delivery, even when everything in the delivery was correct. This way the Purchasing Manager knows that no further actions are necessary.

DOC Reporting
• In order to get any machinery in your store fixed, you need to fill out the DOC Reporting Typeform. If the problem is super urgent causing major operational difficulties, you should at all times contact your DOC Manager. Otherwise, fill out the sheet thoroughly and the DOC Manager will get back to you.
• Descriptions: The DOC Manager is doing their best to fix all problems as fast as possible, so remember, the better descriptions and the better pictures you attach, the easier and quicker it will be for them to solve your problem.
• Execution of reporting: Remember that the DOC Manager has a lot of stores to take care of. Therefore, report the problem as soon as you identify it. Do not wait until you have a handful of issues to report. It doesn’t get fixed quickly for that reason.
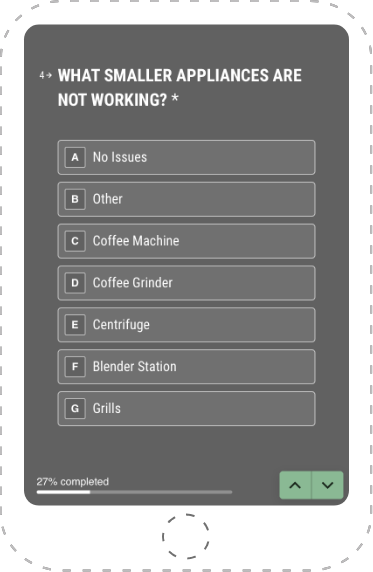
Smaller Appliances
The Typeform is divided into two sections depending on what kind of machinery you are facing issues with:
Smaller appliances like Coffee Grinder, Centrifuge, Blender Station, etc. If your problem is regarding the small appliances simply fill out the first half of the Typeform and choose “No Issues” when reaching the Larger Appliances section.

Large Appliances
Larger appliances like Dishwasher, Ice Machine, Sinks, etc. If your problem is regarding the larger appliances, answer “No Issues” in the small appliances section and you will go directly to Larger Appliances.
Choose your bar type

A mobile management team who travel from project to project. Specialists within their areas of responsibility. Have a narrow-minded approach towards operational tasks; Advanced Training, Implementation, CONCEPT ENGINEERING, MANAGEMENT PERFORMANCE.