
Execute re-stock

Juice Station
1/
8
How to Train
Juice Station
The Juice Station is where we produce all our fresh Juices and Shakes as well as the Acai Bowl. Follow the steps below when carrying out a Juice Station training:


Certify in the "Juice Station" section in Attensi until the dotted line:
- Video: Introduction to Juice Station
- Game: Juice Station
- PDF: Juice Station Products
*Franchise Markets: Trainee to study e-Campus module

Teach the practical procedures on shift by covering all areas of this training module using the training tag: Juice Station on WP2

The following days, the Trainee practices all training goals until they are ready for the validation.

Carry out a module validation to measure performance and celebrate growth. Plan a validation shift using the validation tag: JUICE STATION VALIDATION.
Part 1: Knowledge Validation in Attensi
The Juicer will start out by certifying in the validation modules in Attensi:
- Juice Station Checklist
- Juice Station Validation
Part 2: Practical Validation on shift
The Juicer will show they are capable of executing their theoretical knowledge in practice.
Part 3: Register on WP2
If the Trainee passes, register the validation as passed in WP2 and move on to the next module. If the Trainee fails, grade the validation as failed in WP2. Then, share improvement points, allow for more “Practice On Shift” and plan a new Validation Shift.

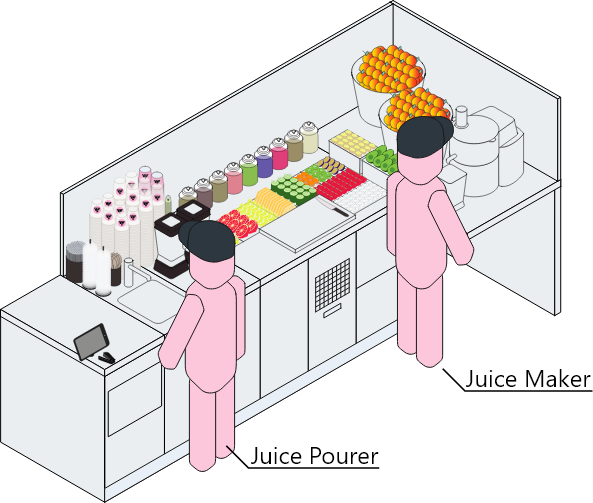
The Juice Station
When working on the Juice Station, there are two positions to cover. These positions can all be covered by one Juicer, or the positions can be split out between two Juicers.
Overview of the Juice Station
.png)
Almond Butter
Funnel
.png)
Maca (UK ONLY)
Teaspoon
.png)
Utensil Storage
1/9 Steel Canteen
d.png)
Date Puree
Size 40 scoop

Contains Nut Statement
Allergen Stickers

Almond Butter
Blender

Red Dishwasher Brush
Almond Butter Cleaning

Matcha
Squeeze Bottle
.png)
Matcha
Measurement Cup
.png)
Cacao Powder
Teaspoon
Beetroot Powder
Teaspoon
.png)
Expiration Date
Day dot stickers

Almond Butter
Squeeze Bottle

Almond Butter
Squeeze Bottle Lid
.png)
Date Puree / Almond Butter
1/6 Steel Canteen

Acai Scoop

Centrifuge
Oil Bottle

Fruit Knife

Cutting Board
Juice Prep

Protein Powder
Standard Scoop

Black Pepper
Grinder

Elderflower

Blender Can
50oz

Ice Machine
500ml - Spoon

Ice Cubes / Berries
250ml - Spoon

Centrifuge Scraper

Large Juice Lids

Small Juice Lids
Hygiene
Hand washing
Washing hands reduces the possibility of contaminating any food products you touch. We wash our hands not only to be hygienic but also to show humbleness and respect to our guests.
When to wash your hands: You must wash your hands whenever you think they may have become dirty/contaminated.
Some examples after which you must wash your hands:
- When first entering behind the bar for a shift
- You’ve handled cash
- You enter the bar after going to the locker room or storerooms
- After a sneeze, a cough, or touching your face
- Using a cleaning cloth
- Picking something up from the floor
- After using the toilet
- Emptying bins
- After a break
- Taking a cigarette or vape break
- When gloves your gloves tear
- And MANY more! When in doubt, wash your hands
Gloves
Gloves are an extra precaution to further reduce the possibility of contamination from your hands reaching food. It is very important to change gloves when they are dirty or torn.
You must wear gloves when:
- Operating the juice station
- Cutting fruit and vegetables.
- Otherwise, treat your gloves like your hands and change gloves in the same situations as you would wash your hands (see above)
Remember you must change gloves:
- If you get any almond butter on your gloves
- Making any item where a customer has indicated that they are allergic to one of our ingredients
- Where a customer has a personal preference or religious reason for us to use new gloves
Sink no. 2 (Juice Station)
The sink placed in the bar next to the juice station is used to rinse blender cans. If there is no can-flusher for the milk pitchers, they will also be rinsed in this sink.
Clean on the Go ‘COTG’
To maintain a fast workflow and minimise the need for frequent hand washing we use Clean-on-the-Go procedures. COTG is performed with paper hand towels and sanitiser instead of using cloths and is purely to remove debris and to sanitise the work surfaces. Once the paper hand towel has been used, it must be disposed of immediately.
Cutting boards are scraped clean with a metal scraper, and wiped after with paper if needed.
If there is spare time, clean other items such as boards, knifes, and other utensils.

Ice Cubes
Ice cubes can only be removed from the ice machine using the designated plastic spoon. In every bar, there is one specific spoon for this purpose. No other equipment or hands can be used to pick up the ice cubes. The spoon must not be left in the ice and must be cleaned and sanitised every night.
When ice cubes are picked up from the cooling grave and used in the juice production you do not need to use a spoon as it treated as an ingredient.
FIFO
First in first out – FIFO is fundamental for a healthy stock handling. FIFO means “First In, First Out”. FIFO is the goods “workflow” from when we receive our goods, to which order we use them. It is important to make sure you stack up the oldest food items on top / in front. Following FIFO helps us ensure that only fresh food is used in our products.
HIGH RISK INGREDIENT: Almond Butter
Storage:
- Almond-filled squeeze bottles must be stored with the dispenser lid facing down and in a 1/9 canteen
- Almond-filled squeeze bottles must not to be stored above other foods.
- Almond-Filled squeeze bottles should be kept at room temperature and not be placed in the fridge over night
Product Making:
- Use only the red blender can for making shakes containing almond butter
- Dispense the almond butter using the squeeze bottles
- You must change your gloves if you get any almond (no matter how little) on your gloves
- Do not refill squeeze bottles – they must be cleaned after every use.
Communication:
- If a guest orders a shake containing almond, ask if they have any allergies to nuts. If the answer is yes, inform them that the shake contains nuts and do not serve it to them.
- The Allergen statement must be displayed in a visible position close to the POS
Serving:
- You must place a 'contains nuts' sticker on the lid of any shake which contains almond butter.
Cleaning:
- Only use the red dishwashing brush for this. The red equipment must be thoroughly cleaned with soap and hot water before placing in the high temp sanitizer.
- Squeeze bottles must be washed using pesto bottle technique after both ends of the squeeze bottle is removed.
- ALL signs of almond butter must be removed before placing in the sterilizer.
Prep Procedures:
- Carefully follow all Prep Manual procedures to reduce risk of cross contamination with Almond Butter
IMS Sheets
Find your markets IMS Sheets here
Validation Checklist
Find your markets Validation Checklist here
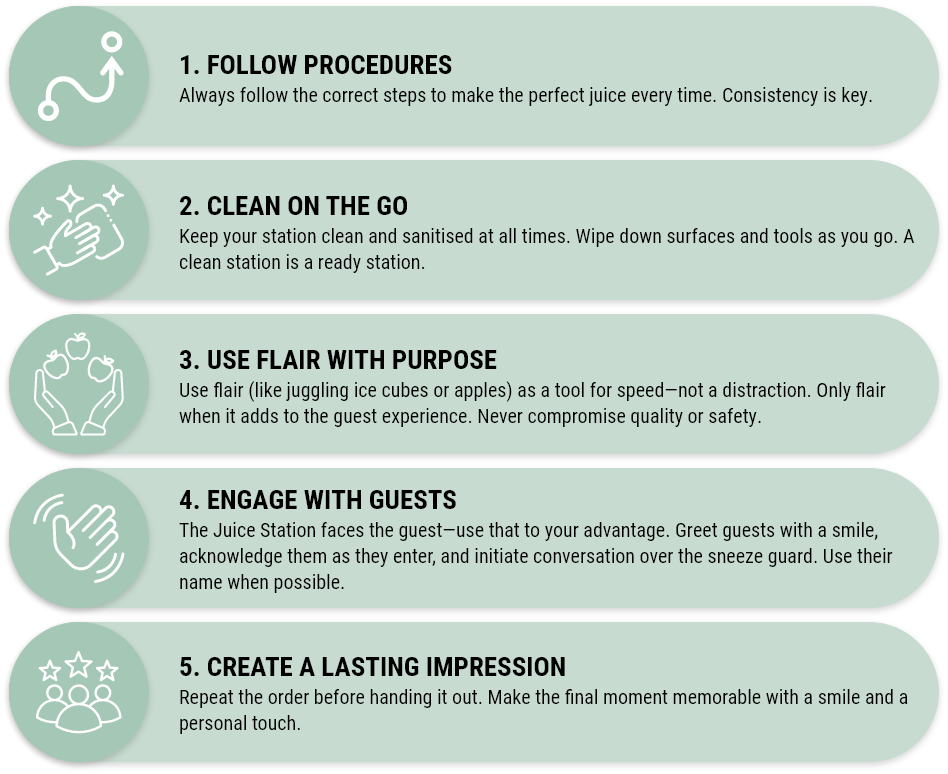
Brand Behavior on the Juice Station
Brand Behavior can be trained and demonstrated at all stations—including the Juice Station. Here’s how to bring it to life in action:
When Mistakes Happen
Use mistakes as a chance to create a memorable experience:
- Instantly fix what went wrong—always prioritise the guest.
- Take full accountability for the mistake.
IMS Sheets
Find your markets IMS Sheets here
Validation Checklist
Find your markets Validation Checklist here
Juice Maker
The goal: Fill the blender can with blendable ingredients for the Juice Maker, make all shakes and Breakfast Bowls
Basics of the Juice Station
When making Juices and Shakes you should keep the following in mind.
Move with a Purpose: Grab enough of each ingredient to work efficiently.
Slow is smooth and smooth is fast: Never work faster than you're able to, since you'll end up making mistakes and have to make the Juice/shake over again.
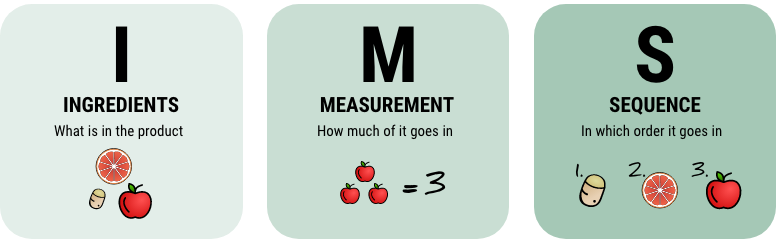
The Juice & Shake ingredients are divided into three categories:

When making Juices and Shakes we follow IMS. IMS means:
THE SEQUENCE FOR MAKING JUICES & SHAKES IS AS FOLLOWS:
1. Ice Cubes
2. Blendable ingredients
3. Non-blendable ingredients
4. Base ingredients
5. Oil
Almond Butter: If the product contains Almond Butter, the red blender can MUST be used. The Red Blender Can can only be used for making product containing Almond Butter.
.png)
1. Ice Cubes & Blendable Ingredients: Take the blender can and fill it up with everything that goes into the blender. Ice Cubes & blendable ingredients.
2. Spill Cup: Pour the leftover juice from the spill cup into the blender can.
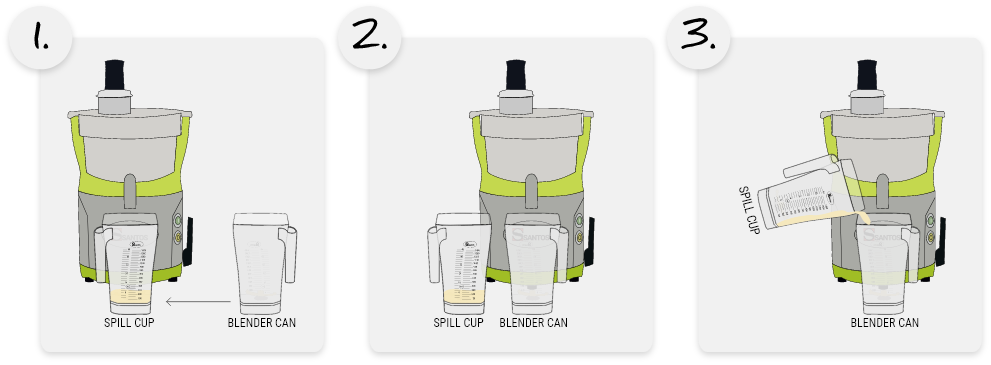
3. Centrifuge: Press the non-blendable ingredients through the centrifuge doing Slow Press.
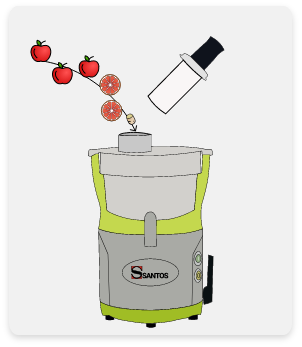
4.1. Base for Juices: Press the base ingredients through the centrifuge, when you've hit measure, swap the blender can with the Spill Cup and place it on the Blender Station.
When pressing juice, you should keep the following in mind
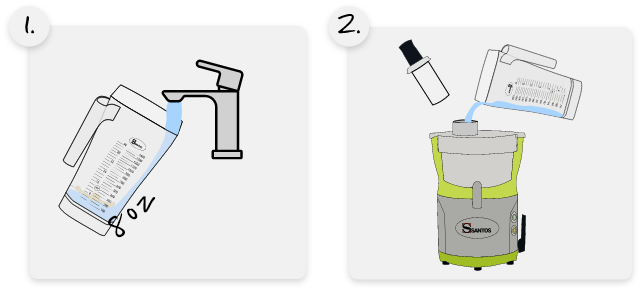
Slow Press: Press apples and ingredients slowly to get the most of out each ingredient. "One apple more, one less store"
Flush: Flush the centrifuge when; changing juice base, before and after shots, by pouring 8oz of water through the Centrifuge.
4.2 Base for Shakes: Place the Blender can on the Blender Station and pour in the Base Ingredient for the Shake.
.png)
5. Oil: Add a squeeze of olive oil in the blender can. Except for Shakes and Juices containing avocado.
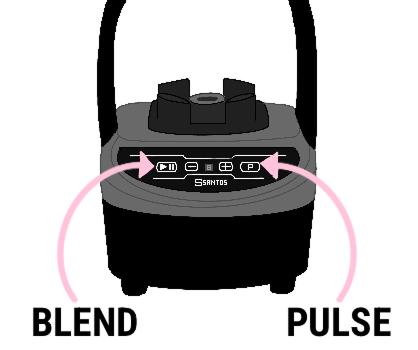
6. Blend it: Pulse/Blend the Juice/Shake until there are no visible chunks left. If there are blendables in the juice, press blend. If there are no blendables, press pulse.
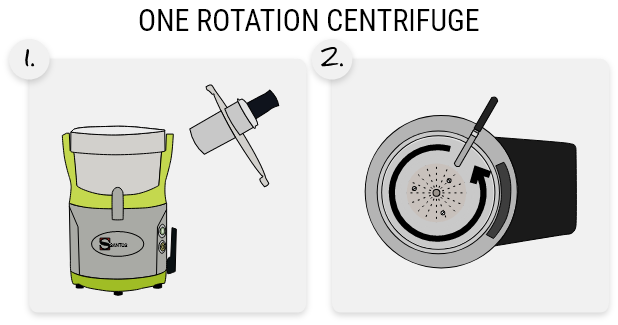
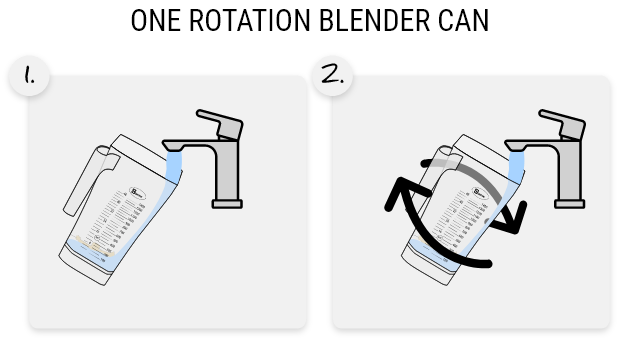
7. Clean on the Go: After the Juice/Shake has been passed on to the Juicer Pourer, perform Clean on the Go by doing One Rotation. Scrape the centrifuge sieve clean in one motion. Finally wipe the countertop clean with a paper towel.


Checklist
Find your markets Checklist here
IMS Sheets
Find your markets IMS Sheets here
Validation Checklist
Find your markets Validation Checklist here
Juice Pourer
The goal: Blend all Juices & Shakes following correct blend time, pour up all Juices & Shakes and send out all products made on the Juice Station to guests.
How to be a Juice Pourer
1. Pour Up: Take a cup corresponding to the size of the Juice/Shake, pour it up, add a lid and straw.
2. Sticker: If the Product contains Almond Butter, you MUST add a sticker stating "Contains Nuts"
.png)
3. The List: When the Juice/Shake is finished, tap it out on the list.
4. Clean on the Go: After the Juice/Shake has been sent out, perform Clean on the Go by cleaning the Blender Can with water doing One Rotation. Finally wipe the countertop clean with a paper towel. Be extra cautious with Clean on the Go after handling Almond Butter
Juice/Shake Packaging
All Juices to go are packed in a bag with a cup holder.
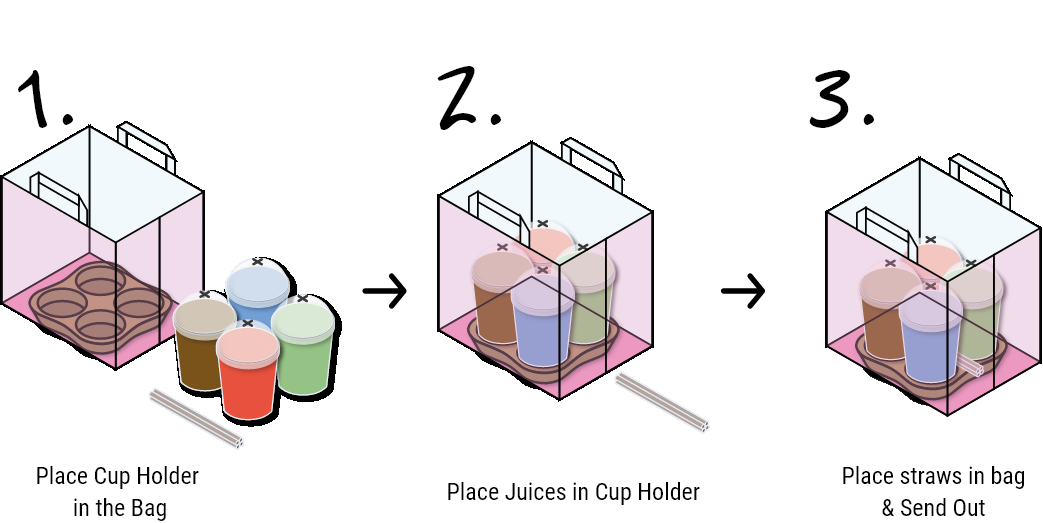


.png)


IMS Sheets
Find your markets IMS Sheets here
Validation Checklist
Find your markets Validation Checklist here
Breakfast Bowl Making
When making Breakfast Bowls you should keep the following in mind.
Move with a Purpose: Grab enough of each ingredient for all the Breakfast Bowls you're making to work efficiently.
Slow is smooth and smooth is fast: Never work faster than you're able to, since you'll end up making mistakes and have to make the product over again.
When making Breakfast Bowls we follow IMS. IMS means:

THE SEQUENCE FOR MAKING BREAKFAST BOWLS IS AS FOLLOWS:
1. Yoghurt or Overnight Oats
2. Powders as add-ons
3. Toppings
4. Non-powder add-ons
How to make Breakfast Bowls
Breakfast Bowls
1. The Base: Start by filling Bowl with the base ingredient (Yoghurt or Overnight Oats).

2. Powders as add-ons: If the guest has added powders (protein, creatine, etc.) to their Breakfast Bowl stir it together with the base using a wooden spoon.

3. Toppings: Place all toppings on top of the base in the Breakfast Bowl.

4. Almond Butter as Add-On: If the guest has added Almond Butter to their Breakfast Bowl swirl it on top using the Squeeze Bottle, then add a "Contains Nuts" sticker.

5. Finalize: Serve the Breakfast Bowl with a spoon and napkin.
After the product has been made
1. Send-out: When the Breakfast Bowl has been made, tap it out on the list. Call out the guest's name and hand over the Breakfast Bowl with a smile.
2. Clean on the Go: After the Breakfast Bowl has been sent out, perform Clean on the Go by wiping the countertop clean with a paper towel.
Breakfast Bowl Packaging
All breakfast bowls to-go are packaged in a with a lid with a spoon and napkin.

The List Overview


How to videos

IMS Sheets
Find your markets IMS Sheets here
Validation Checklist
Find your markets Validation Checklist here
Validation Checklists & IMS Sheets
These tools support in-store training by making learning clear and consistent.
- Validation Checklists track progress and ensure key procedures are trained and completed.
- IMS Sheets give a quick overview of our products and how to make them.
Together, they help new Juicers build confidence and get up to speed faster.
Download and print-out for your market here:

Closing Tasks
Deep Clean Centrifuge

Closing Tasks
Espresso Machine Cleaning
IMS Sheets
Find your markets IMS Sheets here
Validation Checklist
Find your markets Validation Checklist here
Cleaning Tasks

Clean Seating and Tables

Clean Trash Bins in Customer Area

Clean Bar Bins

Clean Bar Lamps + Speakers

Clean Cleaning Tools

Clean Drains

Clean Floor Panels

Clean Ice Machine

Clean Sandwich Grills

Clean Walls and Pictures

Clean Fridges

Deep Clean Stockroom + Fridges

Clean Bar Filters

Clean Fruit Baskets

Clean Dishwasher

Clean Sinks

Clean Centrifuge Cave

Deep Clean GB5

Transport Wagons
Bar Cabinets
How to handle Cleaning Detergents

Dishwasher Detergent
Cafiza
Multipurpose
IMS Sheets
Find your markets IMS Sheets here
Validation Checklist
Find your markets Validation Checklist here

Prev
13/
8
IMS Sheets
Find your markets IMS Sheets here
Validation Checklist
Find your markets Validation Checklist here